
The Zoom Scheduler in Canvas enables instructors to set up bookable Zoom meeting slots for students. While it serves as an alternative to Canvas’s built-in appointment scheduler, it does come with some limitations—for example, scheduled meetings do not appear on the Canvas calendar. However, with this tool, students can book, view, join, and cancel meetings directly through the Zoom integration, and both instructors and students receive email confirmations once a booking is made.
This guide will walk you through enabling the Zoom integration, creating an appointment schedule, and showing students how to book their meetings.
Enabling the Zoom Integration in Canvas
Before you can create bookable appointments, you’ll need to enable the Zoom integration in Canvas. If you don’t already see the Zoom link in your course menu, follow these steps to enable it:
- From your Canvas course menu, select Settings.
- Select the Navigation tab.
- Select the three dots next to Zoom and select Enable.
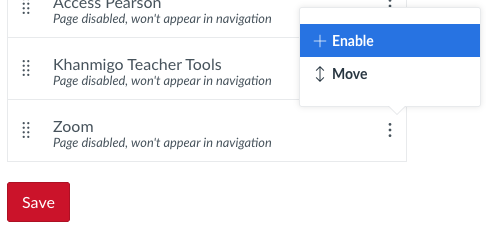
- Scroll to the bottom of the page and select Save.
Creating Appointments
To set up a Zoom appointment schedule for students, follow these steps:
- From your Canvas course menu, select Zoom.
- Open the Appointments tab.
- Select My Schedules.
- Select + Create Schedule.
- Under New Bookable Schedule, set the days you are available to meet with students.
- Enter the time slots you are available on the selected days.
- Ensure there is a defined start and end time. Slots cannot overlap.
- (Optional) To apply the same schedule across multiple days, enable Follow the same schedule each day.
- (Optional) To set an end date for the recurring schedule, enable End repeat on and select the ending date.
- Note: Students will not be able to book appointments after this date.
- Enter the duration of each appointment slot.
- (Optional) Add a description for the appointment schedule.
- Click Save.
