
Once a Camtasia video is completely assembled in the Timeline, it’s time to export your video to a mp4 or other file type and share it with the rest of the world.
Exporting Onto Your Computer

Depending on your version of Camtasia and computer operating system, there are different ways to get to the exporting options for Camtasia. In newer versions of Camtasia for both Windows and Mac, there will be the “Share” Button on the right hand corner of the screen which will produce a drop down menu when clicked on. This will have a few different preset profiles based on what platform you wish to share your content on. By clicking on the desired option, Camtasia will log you onto the service and publish the content directly from the Editor.
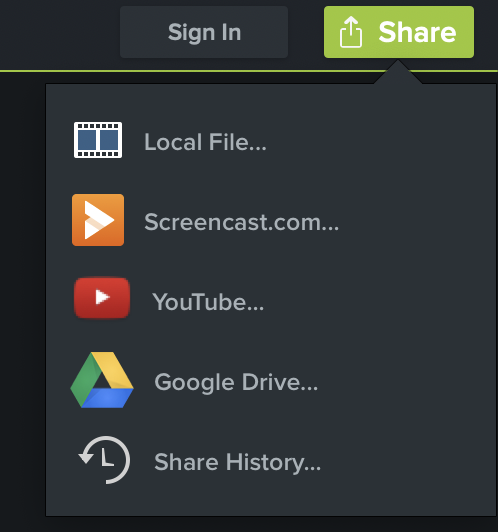
For most common exports, you will want to be using the “Local File” export option regardless of what version of Camtasia you are using, because it will save a copy of the complete video onto your computer that you can take and share to the most types of streaming or sharing platforms. To find the “Local File” option on older versions of Camtasia (works with updated versions too) you can go to the top of your screen to access “File>Produce and Share” or use keyboard shortcut “CTRL+P” for Windows or “Share>Local File” or keyboard shortcut “COMMAND+E” for Mac.
Regardless of your computer type, you will then be taken to a screen that will allow you to name your video, choose where you where you will save your video on you computer, and choose what video type you would like to save your video as. .mp4 is the recommended video type because it is widely accepted across all video sharing and viewing platforms. After the preferences have been set, click the “export” button and the video will compile itself onto the direct location it was set to, but Camtasia will need to be open during the process.

Once the exporting process is done, you will be able to save the Camtasia project and exit the application.
Sharing Your Video To Canvas With Sharestream
Once the videos have been downloaded onto your computer, you can go over to your Canvas courses and use the media hosting service “ShareStream” to place these videos into your course without taking up valuable file storage space within the course itself. There are multiple ways to complete the upload process which we have laid out in our ShareStream documentation guide.