
OneDrive is a reliable alternative to Google Drive (CI Docs) for sharing course materials. This guide walks through creating a shared folder and generating a link that students and colleagues can use to access your files — no special account required on their end.
Before You Begin
Have your course materials ready to upload, and a way to send students the link (i.e., campus email)
Step 1: Open OneDrive from the myCI Portal
- Sign in to the myCI Portal.
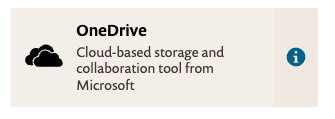
- Locate the OneDrive tile (labeled “Cloud-based storage and collaboration tool from Microsoft”) and click it to launch OneDrive.
- Alternatively, if you do not have the OneDrive service pinned, you can use the Search bar at the top of the page to locate it more quickly.

- Alternatively, if you do not have the OneDrive service pinned, you can use the Search bar at the top of the page to locate it more quickly.
Planning Your Folder Structure
Before creating folders, it helps to think about how you want to organize your files. OneDrive lets you share at the folder level, so your structure determines what others can access.
There are two common approaches:
- Share the main course folder. Create one folder for your course and share the whole thing. Everything inside including any subfolders you add later, will be available to anyone with the link. This is the simplest option if all your materials are meant for everyone.
- Share select subfolders. Create a main course folder for your own organization, then create subfolders inside it (e.g., Readings, Assignments, Slides). You can share individual subfolders while keeping others private. This works well if some materials are for students and others are not.
Neither approach is wrong; it depends on how you prefer to work. The steps below apply either way.
Step 2: Create a Folder for Your Course
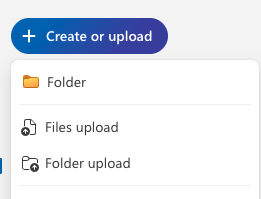
- Click the + Create or Upload button near the top left of the page.
- Select Folder from the menu.
- Give your folder a clear name, such as ENGL 201 Course Materials or Spring 2026 Resources.
You can also choose a folder color to make it visually distinct in your file organization - Click Create.
Using your course name and term in the folder name makes it easier to manage multiple courses across semesters.
Once the folder is created, click My Files to return to your file view and locate it; folders are listed alphabetically. You can also click the folder name in the notification pop-up that appears at the bottom of the page to go directly to it.
Step 3: Upload Your Course Materials
- Within the folder, click + Create or Upload again and choose Files upload or Folder upload.
- You can also drag and drop files directly from your computer into the browser window.
- Wait for all files to finish uploading before moving to the next step.
The + Create or Upload menu includes additional options below Files upload and Folder upload (i.e., Word document, Excel workbook, and PowerPoint presentation). These options create new blank files directly in OneDrive rather than uploading existing files from your computer. Use Files upload or Folder upload to add materials you have already prepared.
Step 4: Share the Folder
Depending on the folder structure you chose earlier, locate the folder you want to share: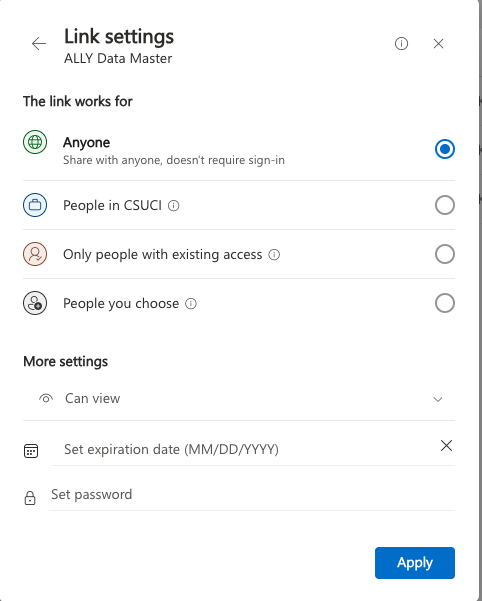
- Sharing your main course folder: Go back to your OneDrive main view (My Files), where your course folder is listed.
- Sharing a subfolder: Open your main course folder first (i.e., Class XYZ), then locate the specific subfolder you want to share (such as Readings or Slides). The steps below apply to whichever folder you are sharing.
- Hover over the folder name. A Share button and a three dots ( . . . ) menu will appear to the right of the folder name.

- Click Share directly, or click the three dots and select Share from the menu if your screen is small or the button is not visible.
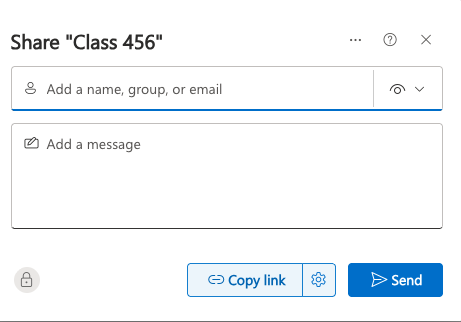
- In the sharing window, click the gear icon next to the Copy link button to open the link settings. This is where you will set the permission level before copying or sending the link.
Choosing the Right Permission Level
- Anyone — The link works for anyone, no sign-in required. This is the best option for courses with a mixed audience, since students do not have institutional Microsoft accounts.
- People in CSUCI — Only faculty and staff with CSUCI Microsoft accounts can open the link. This option is not suitable for sharing with students.
- Only people with existing access — Limited to people who have already been granted access to your OneDrive. Not practical for general course sharing.
- People you choose — You enter specific email addresses individually. This works for students if you use their myCI email addresses, and it is a good option when you want to limit access to a specific group.
- Under More settings, confirm that Can view is selected. This prevents students from editing or deleting your files.
- Click Apply to save the settings.
- Click Copy link. The shareable link is now on your clipboard.
Step 5: Share the Link
Once you have copied the link, you can share it in many ways, including:
- An email to individuals or a group
- A syllabus or course document
- A team or department shared document
- A Microsoft Teams channel or chat
- An Outlook calendar invite
If you selected “Anyone,” recipients do not need a Microsoft account. They can open the link in any browser to view or download the files.
Managing the Folder Over Time
- Adding files: Open the folder and upload at any time. Students will see new files the next time they use the link.
- Removing files: Right-click a file and select Delete. It disappears from the shared view immediately.
- Replacing a file: When you upload a file with the same name as an existing one, OneDrive will prompt you to either replace the existing file or keep both. Always choose Replace. If you keep both, OneDrive renames the new file by adding a number (such as
file(1).docx), which means recipients may access the wrong version. From an inclusive design and Title II compliance standpoint, maintaining a single current version ensures you have one file to keep accessibility-compliant and is the only one people can access. - Stopping access: Right-click the folder, select Share, then Manage access to disable or delete the link at any time.
Accessibility Considerations
OneDrive shares files as-is — it does not modify or improve a document’s accessibility. Before uploading, make sure your files are structured and accessible:
- Word documents (.docx): Use proper headings, lists, and alt text for images. Avoid using formatting alone (such as bold or color) to convey meaning. See the Word Document Accessibility Checklist for guidance.
- PowerPoint presentations (.pptx): Use slide layouts, add alt text to images, and ensure reading order is logical. See the PowerPoint Accessibility Checklist for guidance.
- PDFs: Ensure the file is text-based and not a scanned image. Scanned PDFs are not readable by assistive technology unless they have been processed with optical character recognition (OCR) and properly tagged.
- Excel spreadsheets: Use meaningful sheet names, include column and row headers, and avoid relying on color alone to convey information. See Accessibility best practices with Excel spreadsheets (Microsoft Support) for guidance.
- Images and scanned documents: Provide a text-based alternative whenever possible. A scanned handout or image of a slide is not accessible on its own.
Common Questions
Someone says the link does not work.
Ask them to try a different browser or open the link in a private/incognito window. If you selected “People in CSUCI” and the recipient does not have a CSUCI Microsoft account, they will be blocked. Switch to “Anyone” instead.
Can recipients edit or delete my files?
Not if you set the permission to “Can view.” Recipients can only view and download files.
Does the link expire?
Not by default. The link stays active until you manually remove it. If your institution has set a link expiration policy, you may see an option to set an expiration date in the sharing settings.
I want to stop sharing the folder.
Right-click the folder in OneDrive, select Share, then Manage access, and disable or delete the link.
