
Overview
CI Docs is CSUCI’s collection of Google Apps, such as Google Drive, Google Docs, etc. Creating and storing your syllabus in CI Docs streamlines the revision, posting, and communication process between you and your students. In other words, you only need to share/upload your syllabus once. Read on for more information.
Why Create a Syllabus in CI Docs?
Creating your syllabus in or uploading your syllabus to CI Docs has many benefits. Have you ever posted your syllabus in your course, only to come across a date for an assignment that you need to change? Or a grading calculation that needs to be updated? If you have, then you’ve undoubtedly experienced the pain of editing, re-uploading, and then fixing links in your course that comes as a result.
By having your syllabus in CI Docs, this headache can be alleviated. Since documents in CI Docs are living documents, meaning that they’re able to be updated and edited in real time, fixing any errors like the ones mentioned above is simple. And the best part is that the link to those documents doesn’t change. So there’s no need to update links in your courses. You can simply make changes to the syllabus and be on your way, knowing that the link(s) to it in your course are all still working.
Getting Started
There are two ways to get started sharing your syllabus via CI Docs:
- Create your new syllabus from scratch in CI Docs.
- Upload your existing syllabus to CI Docs and make any necessary changes.
Which option you choose depends on where you are in the process of building your syllabus. Regardless of which option suits your needs, you’ll want to start by logging into myCI and clicking on the CI Docs button.

Creating Your New Syllabus in CI Docs
If you’re creating a fresh syllabus for your course, start by clicking the + New button in the upper left corner, and then select Google Docs.

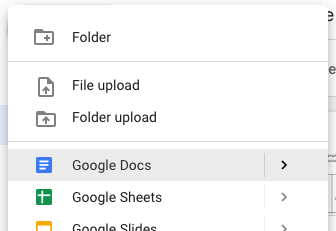
Once you create your new doc, be sure to name it in the upper left name field. As an extra tip, you can create a folder within CI Docs named something along the lines of “Course Syllabi,” so that you have a designated space for your syllabi moving forward. Be sure that your syllabus has all the necessary components. You can refer to our “Policy: What information can/should be included in a course syllabus?” article for help.
Uploading an Existing Syllabus to CI Docs
If you’ve already created your syllabus in MS Word or another program, you can still benefit from uploading and sharing your syllabus via CI Docs. In order to do this, you’ll need to first upload your syllabus document into CI Docs by doing the following:
- Click the + New button in the upper left and select File upload
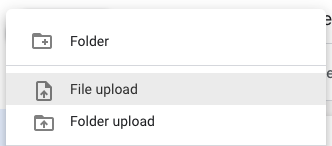
- Locate and select your syllabus file on your computer and click Open.
- Double-click the newly uploaded file in CI Docs
- Your DOCX file will open. Please note the file will be editable but is not a Google Doc/CI Doc so the GrackleDocs plugin will not be available. There will be a colored DOCX tile to the right of the file name.
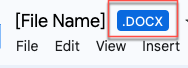
- To convert the file to a CI Doc, Select File and then Save as Google Docs
- The converted file will open in a new tab. You will now have two files with the same title.
It is best to delete the original MS Word version to avoid future confusion.
The original will have an icon with a W.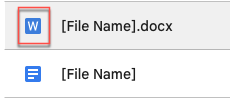 Alternatively, within the document, you can select File and then Move to Trash.
Now that your syllabus document exists in CI Docs, you’re able make changes directly in CI Docs without the need to open your word processing application of choice, save a new version, and replace old versions with the new one.
The next step is to share this document in CI Learn course.
Sharing Your Syllabus in Your Courses
Now that your syllabus is all set to go in CI Docs, you can share it in your course(s). The first step do doing this is creating a shareable link to the document that your students are able to access.
Creating a Shareable Link
- Open your syllabus document in CI Docs if you haven’t already done so
- Click the Share button in the upper right

- Click the Get shareable link option in the upper right of the new window

- Choose which sharing option you’d like to use for your syllabus. The default option, “Anyone at Dolphin Pod – CSU Channel Islands with the link can view,” is recommended. This means that anyone who is signed into myCI and clicks the link will be able to view the syllabus document. Since students will already be signed in when they see this link in a Canvas course, this works seamlessly. However, explore the various options available to see what makes the most sense for you.
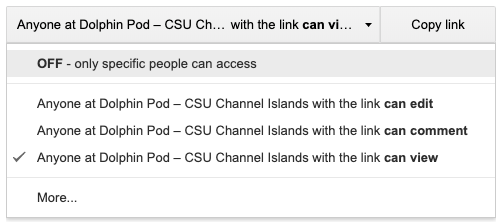
- Click the Copy link button
Adding the Link to Your Course
- Go to CI Learn and navigate to the course that you’d like to add the syllabus link to
- Click the Syllabus link in your course menu
Note: Since we’re simply using a shareable link, you can add the link anywhere in your course you wish using the following steps. Some other useful places are your course homepage, first module, etc. - Click the Edit button in the upper right

- Type some descriptive text to turn into the shareable link. For example, “View Course Syllabus.”
- Highlight the text and click the Link to URL icon in the rich content editor’s toolbar

Pro Tip: You can also press Ctrl+K or Cmd+K on your keyboard to add the link and make it open in a new window when clicked. This is helpful for links that navigate away from your course. - Paste the shareable link that you created and copied previously and then click the Insert Link button
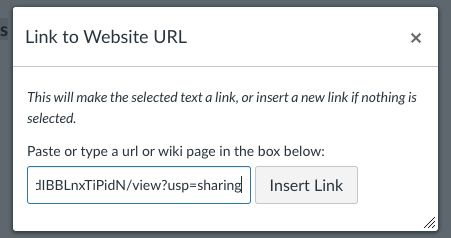
- Click the Update Syllabus button
That’s it! Gone are the worries of having to update links to an updated syllabus document in your course. Now, if you need to make any changes, you can simply navigate to the document in your CI Docs account, make your changes, and be on your way. The link in your course will continue to point to the updated document.
Note!
This is a great time to remind you that it is important to make sure that all documents are designed with accessibility in mind. Please see our help page on Creating Accessible Google Docs for more information, or contact tlinnovations[AT]csuci[DOT]edu for additional support.
